Clear a visible body-inlet blockage
Use the manual’s cyclone and bin releases to reach visible dry debris at the body inlet, then restore every user-removable part.
Version 2.0.0. Required observations are marked *. Your answers stay in this browser.
1. Match the model and parts
Read SV10 on the machine label and compare your parts with manual 229602-01. Filter A has a small pinch handle; Filter B twists off the rear. A star-shaped top is a different version. Confirm the dry motorized head in this manual before following a brush task.
Region: US
Parts: Pinch-handle Filter A and twist-off Filter B; original dry motorized head
Not covered: V8 star pre-filter; V8 Cyclone; Soft roller / Fluffy head cleaning; V10 / V11; Modified batteries or aftermarket heads.
Choose the versions you can confirm.
Compare versions →2. Prepare
Stop for a damaged charger, burning smell, liquid exposure, a swollen or leaking battery, broken catches or an obstruction you cannot safely reach. Contact Dyson and keep the battery sealed.
Consumables and fit
| Item | Specification & fit | Do not substitute |
|---|---|---|
| Dustproof bag | Contain dry bin contents; close the bag after emptying. Original clear bin during emptying | Liquid, hot ash and hazardous materialp11 Emptying the clear bin; Cleaning the clear bin |
3. Follow your checks
Match the model and preparation to start.
Read all possible routes
Is the charger disconnected, the machine cool and undamaged, and your hand away from the trigger?
- Yes — Continue with the matching parts and the checks below.
- No — Stop for a damaged charger, burning smell, liquid exposure, a swollen or leaking battery, broken catches or an obstruction you cannot safely reach. Contact Dyson and keep the battery sealed.
- Not sure — Save your observations and compare the matching manual before continuing.
Have you checked the detached wand/head, and can you identify the manual’s cyclone and bin releases?
- Yes — Follow the documented user-removable route to the inlet.
- No — Inspect the external path and compare the bin-release illustration first.
- Not sure — Save your observations and compare the matching manual before continuing.
Is the suspected obstruction dry, non-sharp and reachable through the documented opening?
- Yes — Remove only accessible material after the cyclone and bin are detached.
- No — A sharp or inaccessible obstruction needs Dyson support.
- Not sure — Save your observations and compare the matching manual before continuing.
4. Follow and record
Complete the checks before recording physical work. Follow steps in order.
Empty and open the bin
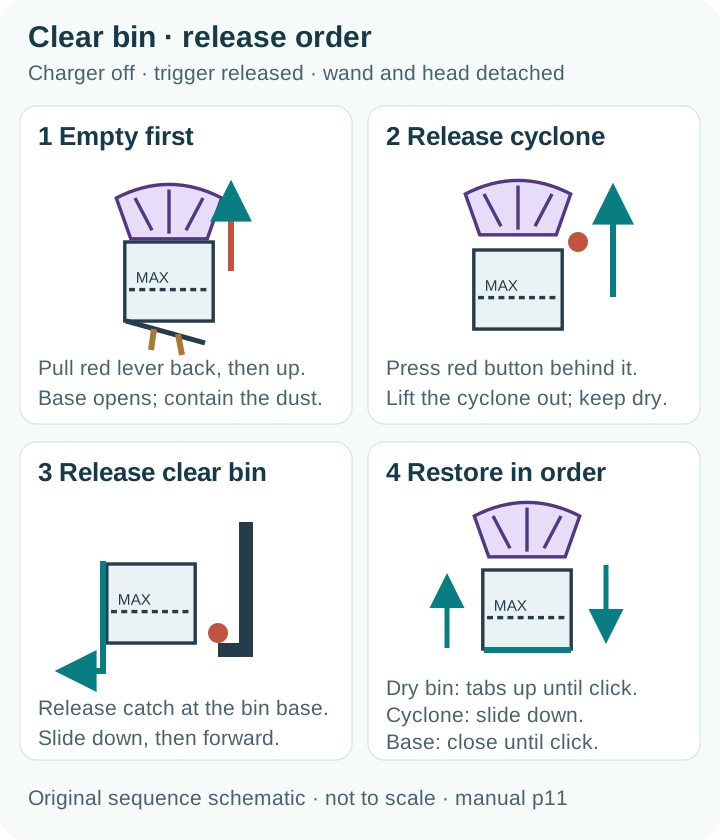
Disconnect the charger and keep the trigger released. Remove the wand/tool, safely empty the bin and leave its base open using the red lever.
Look for: The bin is empty before access to its inlet is opened.
Manual: p11 Emptying the clear bin; Cleaning the clear binRemove the cyclone by its release
Press the red button behind the raised cyclone and lift the cyclone out. Keep the assembly dry and set it aside.
Look for: The identified user release moves normally without force.
Manual: p11 Emptying the clear bin; Cleaning the clear binSlide the clear bin off
Pull back the red catch at the bin base, slide the bin down and bring it carefully forward from the body.
Look for: This exposes the user-accessible inlet area; the motor and battery casings stay closed.
Manual: p11 Emptying the clear bin; Cleaning the clear binLocate and remove reachable debris
Inspect the exposed inlet area with good lighting and compare the Stubborn blockages illustration. Carefully remove the visible dry obstruction, watching for sharp objects. If it cannot be reached safely, stop.
Look for: Record the location and material actually found; do not probe hidden internal passages.
Manual: p12 Looking for blockages; Blockages – automatic cut-out; p8 Stubborn blockagesRecheck the opening
Check that the visible inlet is clear and that no catch or plastic part is damaged. Keep all parts dry.
Look for: An unresolved restriction or broken catch requires support before reassembly for use.
Manual: p12 Looking for blockages; Blockages – automatic cut-out; p8 Stubborn blockagesRestore the bin first
Align bin tabs with body grooves and slide the bin upward until the catch clicks. If the bin needed wiping, finish the separate bin-clean task and complete drying first.
Look for: The bin catch holds normally.
Manual: p11 Emptying the clear bin; Cleaning the clear binRestore the cyclone and base
Slide the cyclone into its grooves, push it down to normal position and close the bin base until it clicks. Fit the wand/head, bin and both dry filters securely before any normal-use check.
Look for: Use the after-care task and stop if the symptom recurs.
Manual: p11 Emptying the clear bin; Cleaning the clear bin
5. Keep your result
Record what you observed. A completed checklist does not certify that equipment is repaired.
When to check again
The wand and head are clear but a dry restriction is visible at the bin/body inlet.
As needed for this condition. No fixed calendar interval is specified for this check; choose your own review date if useful.
Your care plan · p12 Looking for blockages; Blockages – automatic cut-out; p8 Stubborn blockagesSources & fit
- Dyson V8 SV10 operating manual, pinch filter (229602-01)p12 Looking for blockages; Blockages – automatic cut-out; p8 Stubborn blockages; p11 Emptying the clear bin; Cleaning the clear bin · Checked 2026-10-13
- Choose your Dyson V8 support: star or pinch filterV8 support selector: pinch handle versus star filter · Checked 2026-10-13
Independent, AI-assisted guidance. No physical repair trial is claimed. Manufacturer instructions for your exact version take priority.