Check mode and tool before judging runtime
Record Powerful or Max mode and the fitted tool so a short session is compared with the correct manual condition.
Version 2.0.0. Required observations are marked *. Your answers stay in this browser.
1. Match the model and parts
Read SV10 on the machine label and compare your parts with manual 229602-01. Filter A has a small pinch handle; Filter B twists off the rear. A star-shaped top is a different version. Confirm the dry motorized head in this manual before following a brush task.
Region: US
Parts: Pinch-handle Filter A and twist-off Filter B; original dry motorized head
Not covered: V8 star pre-filter; V8 Cyclone; Soft roller / Fluffy head cleaning; V10 / V11; Modified batteries or aftermarket heads.
Choose the versions you can confirm.
Compare versions →2. Prepare
Stop for a damaged charger, burning smell, liquid exposure, a swollen or leaking battery, broken catches or an obstruction you cannot safely reach. Contact Dyson and keep the battery sealed.
Consumables and fit
| Item | Specification & fit | Do not substitute |
|---|---|---|
| Existing Dyson-specified charger | Match the charger to the exact machine through Dyson support; no universal voltage or part number is inferred. US SV10 machine and its specified charger | Damaged, substitute or modified chargers; opening or probing a chargerp11 Diagnostics – lights during charging; p12 Charging and storage; Battery safety instructions |
3. Follow your checks
Match the model and preparation to start.
Read all possible routes
Is the charger disconnected, the machine cool and undamaged, and your hand away from the trigger?
- Yes — Continue with the matching parts and the checks below.
- No — Stop for a damaged charger, burning smell, liquid exposure, a swollen or leaking battery, broken catches or an obstruction you cannot safely reach. Contact Dyson and keep the battery sealed.
- Not sure — Save your observations and compare the matching manual before continuing.
Was the machine fully charged, with both dry filters fitted and no fault or unsafe symptom?
- Yes — Compare mode and attachment under normal use.
- No — Finish charging or required care first; unsafe symptoms and red lights need support.
- Not sure — Save your observations and compare the matching manual before continuing.
Can you identify the Powerful suction and Max positions on this SV10?
- Yes — Record the selected setting before comparing runtime.
- No — Match the power-mode illustration for your machine before making a comparison.
- Not sure — Save your observations and compare the matching manual before continuing.
4. Follow and record
Complete the checks before recording physical work. Follow steps in order.
Record the starting charge
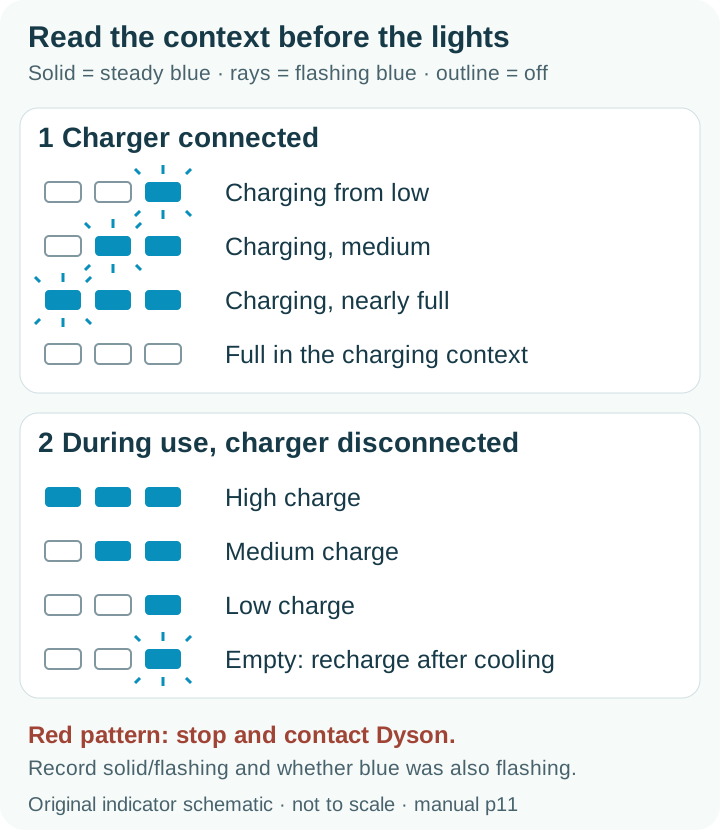
Use the charging task to establish the normal full-charge indication. Record the starting condition instead of assuming the machine was fully charged because it was on the dock.
Look for: An interrupted or uncertain charge makes a runtime comparison inconclusive.
Manual: p11 Diagnostics – lights during charging; p12 Charging and storage; Battery safety instructionsRecord mode and attachment
With the trigger released, read the top power-mode switch and record Powerful suction or Max. Record whether a motorized head or non-motorized tool is fitted.
Look for: The fitted tool and power mode are part of the comparison.
Manual: p6 Power mode; p11 OperationRead the matching upper limit
The manual illustrates up to 40 minutes in Powerful suction, up to 25 minutes with the original direct-drive floor head, up to 30 minutes with the pictured mini motorized tool, and up to 7 minutes in Max. These are upper-limit conditions, not a guaranteed runtime or a battery replacement threshold.
Look for: Do not compare Max with the 40-minute Powerful figure.
Manual: p6 Power mode and runtime illustrationReview other care conditions
If pickup is poor or the filters need care, complete the matching airway/filter task first. After full discharge, let the machine cool for a few minutes before charging. Avoid using it with the battery flush against a surface.
Look for: A care problem or operating condition should be recorded alongside a runtime concern.
Manual: p11 Washing the filters; Washing Filter A; p9 Wash filters; p12 Charging and storageRecord ordinary use without forcing a discharge
If the machine is ready, use it normally on a suitable dry surface and note the approximate active time and reason you stopped. Stop immediately for abnormal behavior; there is no need to deliberately run the battery flat.
Look for: Record whether you ended cleaning, saw flashing blue, or stopped for another symptom.
Manual: p11 Operation; Diagnostics – lights during useChoose a supported next step
If the expectation came from the wrong mode/tool figure, save the corrected comparison. If runtime still concerns you after normal charging and user care, contact Dyson with the mode, tool, active time and lights.
Look for: This record supports a conversation with Dyson; it does not prove battery capacity or authorize internal work.
Manual: p11 Diagnostics – lights during charging; p12 Charging and storage; Battery safety instructions
5. Keep your result
Record what you observed. A completed checklist does not certify that equipment is repaired.
When to check again
A cleaning session ended sooner than expected.
As needed for this condition. No fixed calendar interval is specified for this check; choose your own review date if useful.
Your care plan · p6 Power mode; p11 OperationSources & fit
- Dyson V8 SV10 operating manual, pinch filter (229602-01)p6 Power mode and runtime illustration; p11 Operation; Washing the filters; p12 Charging and storage · Checked 2026-10-13
- Choose your Dyson V8 support: star or pinch filterV8 support selector: pinch handle versus star filter · Checked 2026-10-13
Independent, AI-assisted guidance. No physical repair trial is claimed. Manufacturer instructions for your exact version take priority.