Rinse before use after more than a week idle
Follow the manual’s setup rinse after a longer idle period: five two-cup deliveries followed by the hot-water outlet stage.
Version 2.0.0. Required observations are marked *. Your answers stay in this browser.
1. Match the model and parts
With the machine cool, empty and unplugged, check the underside nameplate for EC685 or EC685 EX:4. Compare the frother and tabbed filter with the linked manual. The support page is on a US domain but its download is English International. Use the manual supplied for your regional appliance; no US voltage or electrical compatibility is inferred.
Region: English International manual 57132C8997_01_0626; regional nameplate must match
Parts: Three buttons, steam dial, removable frother and tabbed perforated filter as pictured in this manual
Not covered: EC680; Dedica Arte EC885; Maestro EC950; Modified steam wand; Different filter design; Regional instructions that differ from this manual.
Choose the versions you can confirm.
Compare versions →2. Prepare
Stop for a damaged cord, burning smell, liquid leaking from the appliance body, all lights flashing while the machine does not work, or a holder that remains hot or pressurized. Disconnect when safe and contact De’Longhi Customer Services. Keep the casing, boiler and internal steam circuit closed.
Consumables and fit
| Item | Specification & fit | Do not substitute |
|---|---|---|
| Fresh clean water | Fill the tank no higher than MAX. EC685 / EC685 EX:4 matching this manual. | Do not operate with an empty tank or with the tank removed.p6 §2 |
| Clean sponge | Use for the space beneath the tank when the machine is cool and unplugged. Normal residual water beneath the tank described in §3. | Treating a casing leak as normal tank-space water.p6 §3 final note; p10 §11 |
3. Follow your checks
Match the model and preparation to start.
Read all possible routes
Is the appliance undamaged, with delivery stopped and parts cool and unplugged for any hands-on work?
- Yes — Keep hands clear of outlets during the specific powered water or steam steps below.
- No — Stop for a damaged cord, burning smell, liquid leaking from the appliance body, all lights flashing while the machine does not work, or a holder that remains hot or pressurized. Disconnect when safe and contact De’Longhi Customer Services. Keep the casing, boiler and internal steam circuit closed.
- Not sure — Save a preparation record and compare the matching manual before continuing.
Does your EC685 or EC685 EX:4 match English International manual 57132C8997_01_0626, including the three buttons, original frother and tabbed filter?
- Yes — Continue only with the controls and parts pictured in this manual.
- No — Find the manual supplied for your region and component version. This guide cannot confirm a different version.
- Not sure — Save a preparation record and compare the matching manual before continuing.
Has the appliance been unused for more than a week and is it undamaged with normal controls?
- Yes — The manual recommends the setup rinse before making drinks again.
- No — For ordinary routine cleaning choose the relevant task; a fault or damaged appliance needs support.
- Not sure — Save a preparation record and compare the matching manual before continuing.
Are the tank and removable coffee parts clean, and is no incomplete descaling cycle pending?
- Yes — Rinse using fresh water and an empty holder.
- No — Finish tank/filter cleaning or the exact interrupted-descale recovery first.
- Not sure — Save a preparation record and compare the matching manual before continuing.
4. Follow and record
Complete the checks before recording physical work. Follow steps in order.
Record the idle period
Record when the machine was last used, or state that the date is unknown but the break exceeded a week. Inspect the cool unplugged machine and original removable parts before reconnecting.
Look for: This task is for a longer idle period; it does not cover a damaged or modified machine.
Manual: p10 §11; p6 §1Prepare fresh water and an empty holder
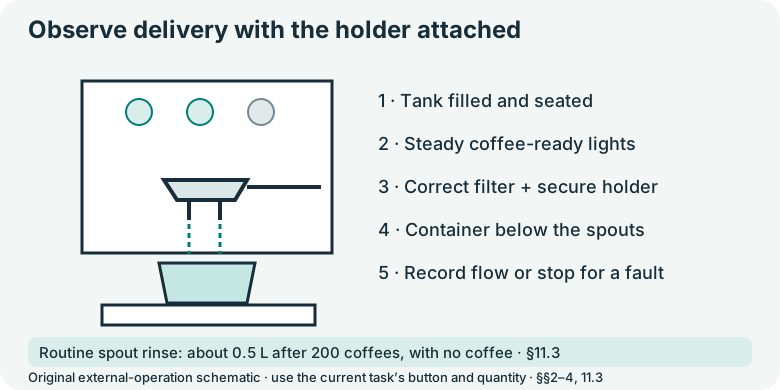
Fill the clean tank with fresh water up to MAX and seat it lightly. Fit the clean original filter and holder without coffee, aligning INSERT and rotating right to CLOSE.
Look for: The tank is seated and the empty holder is securely attached.
Manual: p6 §§2–3; p10 §11Place the container and wait for readiness
Place a container of at least 0.5 litre under the coffee spouts and hot-water/steam dispenser. Power on; let the sequential self-check and flashing heat-up finish until the coffee lights stay on.
Look for: The container covers both discharge paths before the rinse starts.
Manual: p6 §3 steps1–5Complete five two-cup rinse deliveries
Press the two-cup button B3 for the setup rinse. Carry out this coffee-button rinse procedure five times as §3 directs. Keep the holder fitted, keep water in the tank and safely empty the container between stopped deliveries if necessary.
Look for: Five water-only two-cup rinse deliveries are completed and recorded.
Manual: p6 §3 step6; p6 §2Rinse through the hot-water outlet
With the container still under the dispenser, turn the steam dial to the steam/hot-water symbol. Let the setup delivery reach its automatic stop and the flashing coffee-light indication, then turn the dial back to ○. If flow or indications differ from §3, stop and consult the manual or support.
Look for: The hot-water stage has stopped and the dial is closed; no part was removed while hot.
Manual: p6 §3 step7Refill and record the return date
Restore fresh water as needed without exceeding MAX. Record the date and confirm normal ready lights before making a drink. Clean water beneath the tank can occur normally; dry that space regularly with a clean sponge while the appliance is cool and unplugged.
Look for: Both outlet stages are complete and the machine is prepared for normal use.
Manual: p6 §§2–3; p10 §11
5. Keep your result
Record what you observed. A completed checklist does not certify that equipment is repaired.
When to check again
The appliance has not been used for more than a week.
Before using it again after more than a week idle, perform the setup rinse in §3. This is an inactivity trigger, not a weekly descaling schedule.
Manufacturer guidance · p10 §11; p6 §3Sources & fit
- De’Longhi EC685 / EC685 EX:4 instructions (57132C8997_01_0626)p10 §11: more than a week unused; p6 §3 steps1–7; p6 §2 · Checked 2026-10-13
- Dedica Style EC685.TB EX:4 support centerEC685.TB EX:4 → English (International) → Instructions for use, 57132C8997_01_0626 · Checked 2026-10-13
Independent, AI-assisted guidance. No physical repair trial is claimed. Manufacturer instructions for your exact version take priority.