Check coffee leaking around the holder
Inspect the cool filter rim and outlet holes, restore normal holder fit and record one brew observation before a gasket referral.
Version 2.0.0. Required observations are marked *. Your answers stay in this browser.
1. Match the model and parts
With the machine cool, empty and unplugged, check the underside nameplate for EC685 or EC685 EX:4. Compare the frother and tabbed filter with the linked manual. The support page is on a US domain but its download is English International. Use the manual supplied for your regional appliance; no US voltage or electrical compatibility is inferred.
Region: English International manual 57132C8997_01_0626; regional nameplate must match
Parts: Three buttons, steam dial, removable frother and tabbed perforated filter as pictured in this manual
Not covered: EC680; Dedica Arte EC885; Maestro EC950; Modified steam wand; Different filter design; Regional instructions that differ from this manual.
Choose the versions you can confirm.
Compare versions →2. Prepare
Stop for a damaged cord, burning smell, liquid leaking from the appliance body, all lights flashing while the machine does not work, or a holder that remains hot or pressurized. Disconnect when safe and contact De’Longhi Customer Services. Keep the casing, boiler and internal steam circuit closed.
Consumables and fit
| Item | Specification & fit | Do not substitute |
|---|---|---|
| Soft cloth | Dampen for the exterior; use a clean cloth to dry removable parts. External surfaces and removable parts named in the task. | Solvents, abrasive cleaners, alcohol, dishwasher cleaning or immersing the appliance.p10 §11 and §11.4 |
| Fresh clean water | Fill the tank no higher than MAX. EC685 / EC685 EX:4 matching this manual. | Do not operate with an empty tank or with the tank removed.p6 §2 |
3. Follow your checks
Match the model and preparation to start.
Read all possible routes
Is the appliance undamaged, with delivery stopped and parts cool and unplugged for any hands-on work?
- Yes — Keep hands clear of outlets during the specific powered water or steam steps below.
- No — Stop for a damaged cord, burning smell, liquid leaking from the appliance body, all lights flashing while the machine does not work, or a holder that remains hot or pressurized. Disconnect when safe and contact De’Longhi Customer Services. Keep the casing, boiler and internal steam circuit closed.
- Not sure — Save a preparation record and compare the matching manual before continuing.
Does your EC685 or EC685 EX:4 match English International manual 57132C8997_01_0626, including the three buttons, original frother and tabbed filter?
- Yes — Continue only with the controls and parts pictured in this manual.
- No — Find the manual supplied for your region and component version. This guide cannot confirm a different version.
- Not sure — Save a preparation record and compare the matching manual before continuing.
Is the observed leak from the filter-holder rim rather than the appliance body?
- Yes — Wait for delivery to stop and the holder to cool before checking it.
- No — A body leak needs Customer Services; keep the casing closed.
- Not sure — Save a preparation record and compare the matching manual before continuing.
Does the cool holder detach normally, without trapped pressure or a stuck part?
- Yes — Inspect the rim and removable filter.
- No — Leave a hot, pressurized or stuck holder attached and request support.
- Not sure — Save a preparation record and compare the matching manual before continuing.
4. Follow and record
Complete the checks before recording physical work. Follow steps in order.
Stop and record the leak position
End delivery using the same coffee button, wait after delivery and let the holder cool. Switch off and unplug before cleaning. Record where water or coffee appeared.
Look for: The symptom is localized to the holder rim; liquid from the casing ends this task.
Manual: p7 §4; p13 §14Clean the rim and cup
Detach the cool holder normally. Wipe grounds from the filter rim and clean the holder cup with a soft damp cloth.
Look for: No loose grounds obstruct the mating rim.
Manual: p7 §4 step4; p10 §11.4Inspect filter and outlet holes
Check the holder spout holes and filter. Use the filter-cleaning task for residue and restore the original insert if missing before continuing.
Look for: The insert is present and seated; the outlet holes are open.
Manual: p13 §14; p10 §11.2Attach with the normal alignment
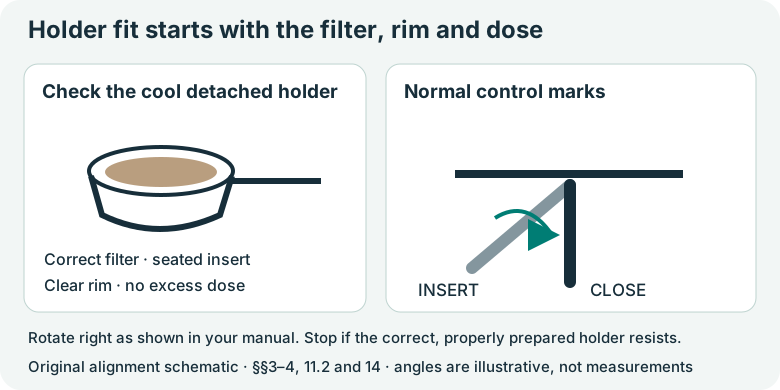
Use the correct filter and a suitable dose. Align the handle with INSERT and rotate right toward CLOSE as pictured until properly attached. If it will not fit normally, use Check a holder that will not fit.
Look for: A normal secure fit is achieved without cross-fitting or forcing an overfilled basket.
Manual: p6 §3 step4; p7 §4; p13 §14Observe one normal brew
With the machine fully assembled, power on, wait for the coffee-ready lights and brew into a cup. Keep clear and watch the holder rim without touching it.
Look for: Record whether the rim stays dry or leakage recurs.
Manual: p7 §4; p13 §14Refer recurring leakage
For continued rim leakage, stop and contact Customer Services. The manual assigns boiler-gasket replacement to Customer Services; this task ends at external cleaning and fit checks.
Look for: The record distinguishes a dry rim from a recurring leak requiring assessment.
Manual: p13 §14: boiler gasket
5. Keep your result
Record what you observed. A completed checklist does not certify that equipment is repaired.
When to check again
Coffee escapes around the filter-holder rim.
Repeat the check if this symptom returns. Any reminder date is your own plan; the manual gives no scheduled interval for this check.
Your care plan · p13 §14Sources & fit
- De’Longhi EC685 / EC685 EX:4 instructions (57132C8997_01_0626)p13 §14: coffee drips from holder edges; pp6–7 §4; p10 §11.2 · Checked 2026-10-13
- Dedica Style EC685.TB EX:4 support centerEC685.TB EX:4 → English (International) → Instructions for use, 57132C8997_01_0626 · Checked 2026-10-13
Independent, AI-assisted guidance. No physical repair trial is claimed. Manufacturer instructions for your exact version take priority.